Improvements: Sharpen
Sharpen

Sharp images makes you stand out
Sharpening is an art, often exaggerated or misunderstood. Sharpen in Rawstudio 1 was implemented as a simple 3×3 convolution in RGB. This is probably the most basic sharpen you will find. It does the job, but it is neither very fast or very flexible. It will produce halos around sharp edges, and amplify noise.
This is the typical look of a halo caused by over-sharpening, a white line above the edge:
From my Avisynth background, I knew a few methods of sharpening images beside simple convolution and “unsharpen mask”. One of the candidates is a script called “Limitedsharpen“. It works by doing a regular sharpen, and based on en edge mask, it will attempt to limit the sharpening, so it doesn’t produce haloes.
I also knew a filter called FFT3DFilter, which I knew was the best free spatial de-noiser for natural images. So I had a look at the sharpen function, and to my pleasant surprise it worked extremely well for natural images.
Basically FFT3DFilter was completely re-implemented for Rawstudio. The sharpen filter is very different from an ordinary sharpen, since it works in the frequency domain. It also works only on the light (luma) channel, so no color noise will be amplified.
To express how it works, you basically have to imagine an Unsharp mask, that work on all radii at the same time. That means that it will sharpen at all radii from 0 to 6 at the same time. The maximum sharpen radius of 6 at 100% size is a value chosen by us, but it has proved to work very well, since a larger radius gives too many sharpening artifacts.
At the same time there is a maximum limit within the sharpen filter to avoid aliasing. Aliasing is a problem when you sharpen so much that previously smooth lines becomes jagged because of sharpening. Here is a small example of aliasing:
The aliasing is here (exaggerated) visible at the light edges. There are also a clear difference between parts that are inside the sharpen threshold and not, in the wood topmost.
Another important aspect of the sharpening process is that it uses the de-noise setting as a noise floor. The effect of this is that no detail below the noise threshold will be sharpened.Let’s look at a real-world example – this is the unsharpened image:
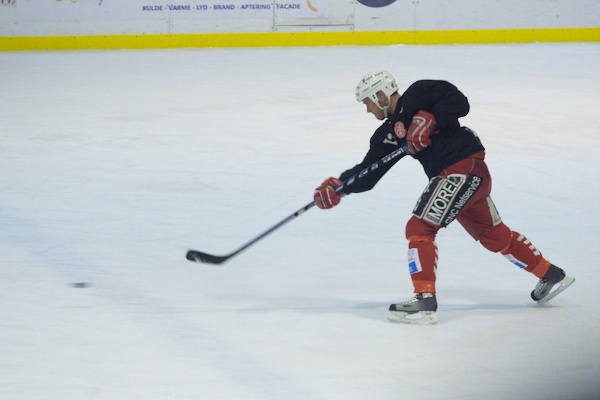
This is then the image with an ordinary Unsharp mask:
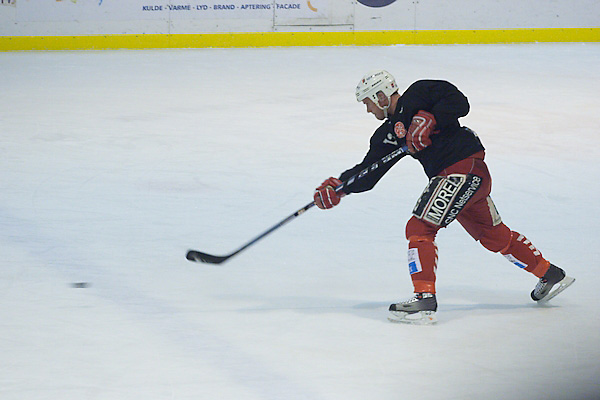
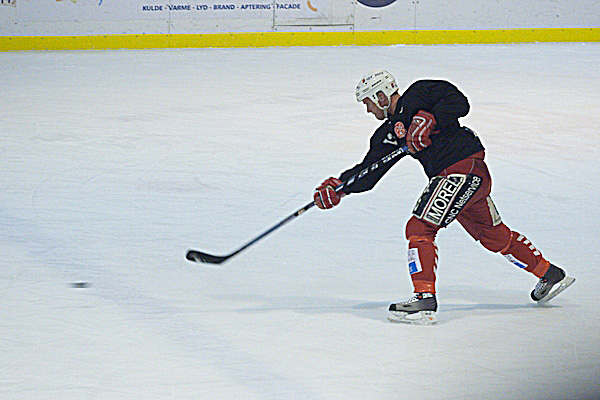
If we compare that to the FFT-based (Rawstudio) sharpen routine, with a similar strength, a lot more details are enhanced in the ice, while the sharpening effect on the player is roughly the same. This is the image sharpened in Rawstudio:

The player is roughly sharpened the same amount, but we find a lot more detail in the ice are. If we try to achieve the same sharpening with unsharp mask, we find that a lot of halos and artifacts become obvious, making the image very processed to look at – and we have still not gotten the same amount of detail in the ice:
Drawbacks
As I started saying, there is no sharpening without some kind of artifacts. This filter is no exception. In my experience you will mostly encounter them in artificial images such as test-chart shots an similar, when you sharpen too much. The artifacts are visible as halos around high contrast edges here is an example:

This is a fairly ordinary test image, 100% view. Unsharpened.

This is what happens when too much sharpening is applied – you get ghosts of straight lines and sharp edges.
The artifacts can obviously be removed by reducing sharpening. Here is the image with more moderate sharpening applied:

Still sharper, but with no noticeable artifacts.
Note that this is the absolute worst case scenario I have encountered. As I mentioned before the sharpen filter is very good with “natural” images, and since most of you hopefully shoot more real-life images than test-charts, I hope you agree on my choice.
Your personal acceptance limit for the amount of sharpening you like is very likely different than mine – you may prefer sharper images and accepting more artifacts – but you get to decide that for yourself.
Example
Here are a few more real-life examples:

Cropped, unsharpened image, click for 100% size.
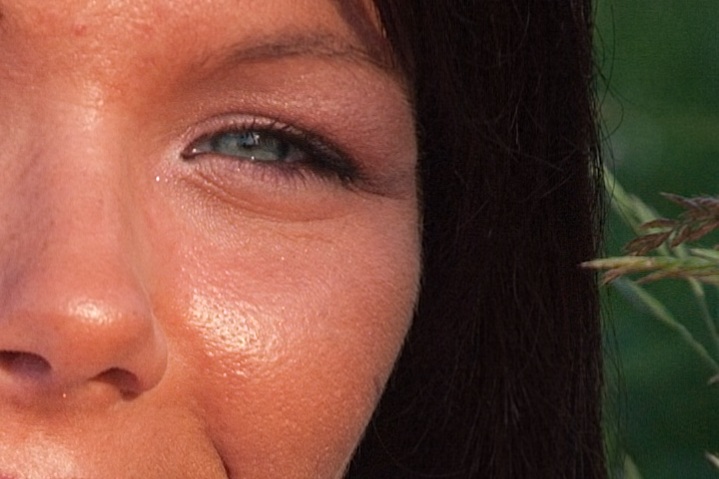
Cropped, unsharpened image, click for 100% size.
So in conclusion we have a unique, radically new sharpening system, that should be able to bring out more detail from your images.

[…] from our presentation of new Rawstudio features in v2.0, we continue from the last entry about Sharpening to Noise […]
Will this new sharpening tool have a threshold setting? There are many situation where only major features need to be sharpened, but not the “low frequency” detail. In your examples, for instance, one may want the ice hockey player sharp, but no greated detail in the ice. Or a sharp outline of the eyes in a portrait, but the skin mostly untouched. I hope this is implemented because if it isn’t I’ll do what I’ve always done: ignore the sharpening functionality in the RAW converter and leave it for the editor. Which is a pity here in Linux because it would be useful to be able to sharpen early, when still in 16bit space, rather than in GIMP, in 8bit space. Thanks for listening and good luck with the coding!
We might consider this, if we can find a good way to implement the UI part of this, and it shows considerable improvements on the images.
As you say it is an obvious improvement, that is likely to find its way into a post 2.0 release.
[…] New, much improved sharpen algorithm [1] […]
Hi
For some reason rawstudio is not exporting my sharpening edits. Im unsure how to diagnose the issue. Is there a logfile or command line switches I can use to find out what the issue is? Other edits like tint etc come through, but not sharpening.